Sunday 21 December 2014

Homemade Bone Broth


Over the past few months, especially as the weather has gotten colder, I have done my best to always have a soup or stew in the refrigerator, for an easy lunch or quick meal at home. Homemade soups made of homemade bone broths are good for every part of your body. On a Saturday or Sunday, pop a chicken carcass or beef soup bones into some salted water, with a couple bay leaves, some rosemary, onion, garlic, carrot, turnip, and maybe even some celery. Bring it to a boil, and then turn it down to a low simmer for most of the day. Strain through a colander and cheesecloth. Throw the veggies on the compost or feed them to the chickens. 


The taste of homemade broth is so much better than anything you could get in a can or a box, and it is packed with nutrients. Store in a bottle for use through the week. 

I try and mix up my soups so that the kids don't get bored but I use my homemade bone broth as the base. The broth is good heated alone in a mug, but some of our other favorites are corn chowder, cream of broccoli or mushroom, French onion, chicken or turkey vegetable, potato with cheese and bacon, seafood chowder and tomato basil. I sometimes use my homemade broth with ramen noodles.
This is definitely a healthier alternative to the flavor packets that come with the noodles. If it looks like you won't use all of your broth within a week, try freezing it in ice cube trays, storing them in containers to add flavor to stir fries and rice.

Saturday 25 October 2014

Simple Living


There is hardly a day go by that I don't find myself sitting down with a cup of tea, visiting my favourite blogs.  The writers are like old friends; kindred spirits.  They tell me about their days, their families, their meals.  They show me the progress on the left sleeve of the sweater they are knitting, or a new dishcloth pattern.  I see their Christmas trees being brought in and decorated, pumpkins carved, eggs painted, closets tidied and organized; simple details of  lives being lived.


I have heard people, who don't seem to understand, comment that no one cares about the minutia of other peoples lives, but I beg to differ, these are the most important things.  When I stand at the checkout counter I am bombarded with the stories about Miley and Britney and  Angelina and Brad all over the magazines. People-stories help us to create our own lives in the way that we want to live them. 

 I understand that blogs don't tell the whole story. Behind the scenes there might be squabbles with partners and children, there might be health issues, there might be fears about money and jobs, but those are the things that we don't need to know.  This is not the part of life we want or need to focus on.  We all have struggles, but it is in the snapshots of beauty and grace-filled bits and pieces that recognize abundant living is available to all.   

In this blog I want to emphasize the simple life.  Simple things should not be confused with the easiest things. Knitting a pair of socks, for instance,  is not easier than buying a pair... but they carry with them such a sense of accomplishment with each wearing.   When I say simple, I don't mean minimalist.  I live in a house with lots of stuff accumulated over a lifetime.  When I say simplify in this context, I mean to part with those things and activities  that do not make me happy and do not reflect the person I am or the family  want to create. When I say simplify, I mean that I create simple meals of simple ingredients, I work hard to support local businesses and farmers and artisans instead of  contributing to the consumer-driven economy. When I say simplify, I mean I am trying to use the simplest of ingredients to clean my house, to save me money and to lessen the impact of harsh environmental toxins in my home. When I say simplify, I mean I am trying to get away from as many disposable items and plastics that I can in an effort to save money and be environmentally sensitive.  In creating this blog, I should make it clear, that I do not consider myself an expert in anything,  I am just sharing bits and pieces of my life as I live it. 

I am excited to spend lots of time working on this blog, and my  hope that you come and visit me with a cup of tea in hand.  


Handmade Rag Rugs

When I was a little girl, our summer cottage was down the red dirt lane from an elderly aunt's. I think it was that early in my life that I fell in love with old furniture and antique items.  Leota (Oat for short) was widowed at a  young age and was left fairly comfortably. Her home was decorated so differently than mine, most of her furnishings came from estate sales and antique stores.  It was at her home that I remember looking at the huge rag rug.  I was only about three years old, but I remember my mother having tea, and I was set on the rug to play with lace edged hankies and little cedar box with a hinged lid and a little brass lock.  I remember the hankies smelled of lavender and cedar.  I remember laying on my belly, with sunlight shining in the picture window, while I traced the fabrics that made up the  the colourful strips in the recycled wool braids and played with the lacy bits of linen.


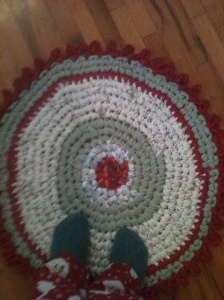
I have attempted braided rugs but I have never made much headway.  I have, however, made several crocheted rugs of cotton sheeting.  Crocheted rugs are instant gratification.  I made this 3’ round rug for my bathroom on a lazy Saturday, just before the new year. 
My rugs are made of cotton or poly-cotton sheets.  I keep a lookout for them at yard sales, or second hand stores. I don’t worry about patterns because they are not seen, it’s the colours and colour combinations that are important.
Rag rugs look great in any room, they wash fine.  The little ones will wash in the washing machine, the bigger rugs, I soak in the tub, scrub them with a little hand brush and let dry in the sun.  The older they get the more I like them, it is as though their colours wash out a bit, and they blend easily with my old furniture. 
Eren at Vintage Chica has a great tutorial on how to make your own rag rug.

Make your own Granola


I have been making an intentional move away from prepared foods. I certainly have not arrived, by any means, but I find myself further down the road than I was a year ago.   I really believe in my heart of hearts that what we are putting into our bodies in the name of convenience is the root cause of the nations' health problems.   On the other hand, I live in a house with two teenagers, and "slow food" is not always an option. We have to have simple to grab and go snacks.   One of our favorite homemade convenience breakfast or snack food is  is homemade granola.  I store it in large 1.5 litre mason jars and try and have a couple variations in my pantry to choose from.  Walnut/ Cranberry and Dried Apple, or  Coconut/ Almond/ Dried Apricots and Blueberries.  or just a Flax Seed/ Sunflower Seed/ and Raisins.   I use whatever combination I have on hand.  We eat granola with milk, homemade yogurt, over berries or bananas, or alone in bagged lunches.
5 c oatmeal (up to 1 ½ c can be substituted with nuts, seeds or a combination of both)
1 c whole wheat flour ( I have to admit, I have used unbleached white flour
1/3 c vegetable oil
1 t cinnamon
1 t salt
1/3   c maple syrup
1/2 c juice (orange, pineapple, or apple)
½  t  flavoring (almond or vanilla extract)
Up to 2 c of dried fruit or coconut
Preheat oven to 300 degrees F. In a large mixing bowl, combine oats, flour, cinnamon and salt; mix well. In a separate bowl, combine oil, syrup, juice and extracts. Slowly pour wet ingredients over dry ingredients, using a spatula to fold and evenly coat the dry mixture with the wet. Spread on a cookie sheet or in a shallow pan  ( I use two 9' x 11' pans) and bake. Turn granola every 15 or 20 minutes so that it toasts evenly. Bake until granola is dry and golden (45-60 minutes). Add dried fruit.   Store mixture in an air tight jar.

Homemade Bread- Yum


I love homemade bread, I love the taste, the smell, and the feel of the dough when I handle it.  I have always made my own bread, but over the past year or two, I have made an effort the number of times that I have actually purchased bread or rolls from the store. It is my gift to my family to provide them with wholesome bread, free of preservatives.  I usually make a rather dense loaf filled with whole grains, or oatmeal, honey or molasses. 
This year I have been very lucky to teach the craft of bread making to several classes of high school students, I get raving reviews from their parents and friends about the confidence they have baking from scratch.  Here is the recipe that I use.


Ms. Hatheway’s Basic Bread Recipe


3 cups warm Liquid
1 Tablespoon Salt
4 Tablespoons Fat
1 Tablespoon Yeast
1 Tablespoon Sugar
5 cups Flour


Notes:
3 Cups warm liquid  (water is fine, I sometimes use milk, whey  or yogurt milk mix… left  over potato water works great) heat on stove to a temp hot to the touch
1 T salt

4 T of fat ( I usually use butter , but vegetable oil, olive oil,  shortening or lard will do fine) make sure the water is warm enough to melt the hard fat
note*****(If you are adding cereal, ie.  Red River Cereal, Oatmeal or Cornmeal, add 1 more Cup hot water even left over potatoes, squash or pumpkin)

Let mixture cool to warm to the touch,  then add,
1 T yeast (If I am in a hurry, I add 2, if it is raising over night, only 1 Tablespoon is enough)

1 T Sugar****note: if you are making brown bread, add 1/3 cups of molasses at this stage instead of the sugar
Let set for about five minutes to a foam.
Add 3 Cups of flour (All purpose flour for a white loaf, or multi-grain, whole wheat, or rye flour if making a heartier grain.)
For the remainder, about 2 more cups of All Purpose Flour, knead in to the softer mixture.  The dough should be kneaded for about 5 minutes, until the gluten strands are elastic and stretchy.

Add any dried fruit or nuts, herbs like rosemary or roasted garlic cloves  (up to 1/2 cup) at this time.

Let rise in a bowl covered with a dishcloth.

When dough is double the size, punch down and form into loaves.

Let rise again…

Bake 350 degrees about 45 minutes for a loaf until there is a hollow sound when you tap on it.


Sticky Buns

Make a Smudge

Melt 1/2 cup of margarine, add ¾ c brown sugar and spread in the bottom of a 10 x 13 pan. 

Roll bread dough into a large rectangle, add ¼ c softened margarine and ½ c brown sugar, sprinkle liberally with cinnamon ( optional ½ c walnuts or pecans)

Roll mixture into a large roll, cut into equal parts place in pan (about a dozen rolls to a pan)

Let rise.

Bake at 350 degrees for 50 minutes

Turn out onto a parchment lined sheet as soon as they are out of the oven. (Don’t leave in the pan, they will stick.)


Other Bread Dough Ideas

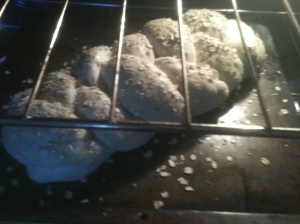
Braided Loaf

Roll loaf in poppy seed, or oatmeal for a more rustic looking loaf

Rolls

Breadsticks (add garlic salt, sea salt, oregano,  or parmesan)

Pretzels (form, poach in salt water and bake on baking sheet)

Roll flat and fry in a dry frying pan as a tortilla

Roll and cut into squares or doughnut cutter, fry in lard, and sprinkle with icing sugar

Pizza crust

Roll and fill with pizza fillings bake

 Sticky Buns / pesto rolls


My New Old Dishes


love mismatched china, as a matter of fact, I find charm in mismatched anything; old wooden pressed-back chairs, antique silver flatware, lace-edged pillow cases and dishes.  I like my collections to look like they have evolved rather than bought as a complete set.  It gives me a special pleasure to point to one piece and say, “that belonged to my great- grandmother, or great aunt, or mother-in-law.” Or “I bought that piece at a little place on the coast of Maine, or Florida or Prince Edward Island.”  I guess I am just a sentimentalist.
For a couple of years now, my everyday dishes have been an evolving mishmash of floral English everyday- wear.  The colours and patterns are fairly consistent; I collect dishes with creamy backgrounds, pinks, yellows and turquoise; mostly from the 1940’s.   I have a variety of platters and serving dishes that make my table look happy.  I have a confession to make, I love hand washing my beautiful collection in my new old-house, with its big white porcelain sink.


 This fall, I decided that the dishes I’ve been using are wonderful for spring and summer, but I needed something a little heartier for the fall and winter.  I didn’t want “Christmas” dishes because the season goes by so quickly, and for those special dinners, I have beautiful English China.  I set my sites on finding odd pieces of transferware.


Transferware is usually available in shades of blues, browns and reds, but occasionally, one can find purples and greens as well.   Transferware became popular in the 19th Century, as English china makers developed a method of transferring pictures from copper plates to tissue and then it is firing it onto pottery.  Prior to the development of this process, only the rich had access to hand painted dishes. Some of the traditional patterns are I am drawn to are scenes of castles and villages, but altogether no matter what the scenes are the table looks terrific.

TransferwareThe rule I have in collecting these old dishes, is that I will not exceed $10 for any given piece.  I have to admit, I have broken that rule more than once for pitchers and serving dishes.  When I visited my favourite antique store, I found several plates marked at more than $45.  Some of these were exceptional, but for everyday use, my $10 limit seemed more than adequate.  I peruse the Sunday Flea Market, the little antique stores, Fredericton Anti-Poverty,  the Salvation Army Thrift Stores and Value Village in search of these dishes

.

Knitted Dishcloths


My grandfather taught me to knit with wooden sucker sticks.  I think I was about three.  Since that time I have always been a knitter, not a fancy knitter, but a knitter nonetheless.  I tend like little simple projects; hats, mittens, socks, shawls, and dishcloths. I think always want to move on to the next project so instant gratification of small projects is good.


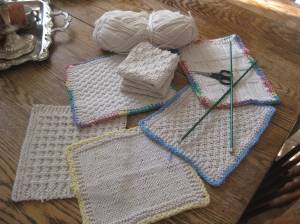
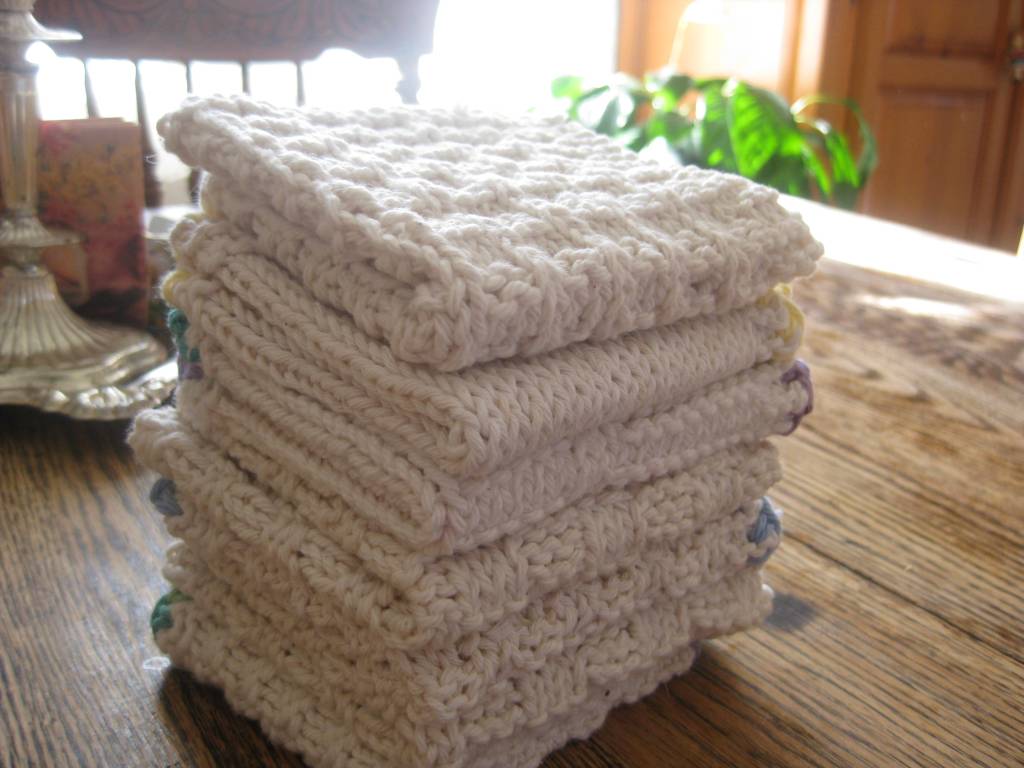
Right now, I am knitting a stack of dishcloths.  They are the perfect project to take with me or pick up in the evening. I make all of my cloths in an off white cotton, and vary the patterns.  Sometimes I add a bit of colour as a border, but I find that the white is easily cleaned, and I like the look of the uniform cream where the coloured dishcloths tend to fade. 


Intentional Homemaking


I am amazed how content I am in my home and my life now. I remember just a few years ago, I always felt the need to escape, to find solace in a local coffee shop or bookstore and even at my workplace. My house felt congested and chaotic, it did not reflect the person I wanted to be. I was angry and frustrated, because things were in such a state of chaos. I wanted something different but most days the house was a mess; garbage cans overflowed and spilled onto the floor, dirty dishes littered the counter, bedrooms had heaps of clean and dirty clothes, my laundry/sewing room looked like a bomb had gone off. I would spend all day cleaning and organizing, and in my wake was just more chaos. This was not a reflection of who I was, and what I valued.

I realized that the thing that I value most is my home, not just the building that I and my girls reside in, but the environment that I create with my moods and my habits. I wanted to create memories of peace and beauty, of wholesome meals and simple pleasures. I wanted a house that reflects us, our interests and personalities.
One thing that singledom has done for me is demand that I be self-sufficient. Rather than this feeling overwhelming, it has been empowering. I no longer wait for someone else to do a job I know has to be done. There is no anger or blame, there is just planning and action. The buck ultimately stops here. I am the one responsible to pay the bills, mow the lawn, take out the garbage, do the laundry, cook the meals and look after the chickens. The girls are a tremendous help and I am so proud of all that they do to help create our house of dreams. We finally have streamlined most of our belongings and put routines in place that make our lives run more smoothly.

Houses do not become homes by merely living in them, it takes vision of what we ultimately want, planning and work to create sanctuary. There is no place in the world I would rather be than puttering in my kitchen, or cleaning out my chicken coop, or knitting by the fireplace. I think we all deserve this feeling whether we are living alone, or with others, in a one bedroom apartment or large home. The feeling we create by intentional homemaking are gifts to ourselves and those that we welcome into our private domains.